Shaving the Yak

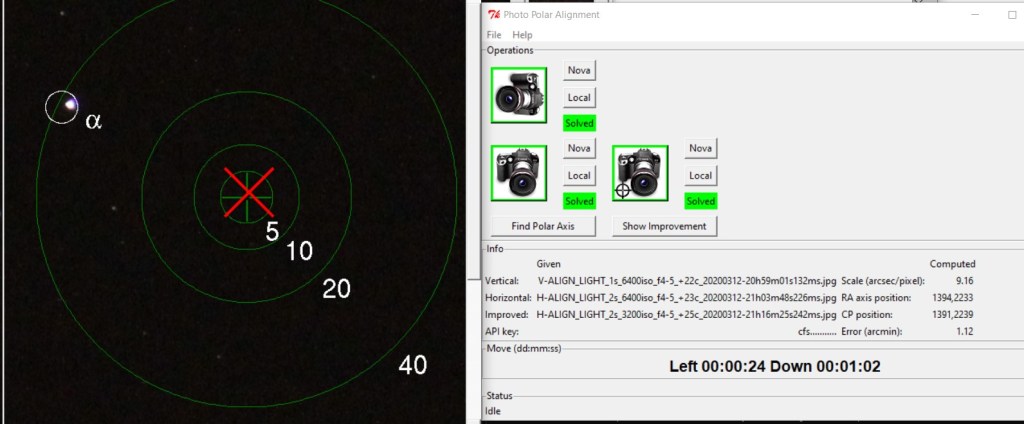
Generally crap results last night but I did make some basic progress.

  • I can reliably connect to the mount from windows with a batch script that deletes the connection and restablishes it
  • I can set the camera to taking small-ish jpegs for doing the polar alignment then have backyardeos switch to high-res for imaging
  • I can use a filter ring to stop the Takumar 200mm lens down to 37mm which is about f/5.6. This seems to reduce, if not eliminate the severe chromatic aberration i was seeing with it.
  • From my side-yard I have a smallish slice of unobstructed sky but i have a good view of Polaris and the Zenith.

Aside from that it was a sh*tshow with false starts and loose clutches stopping me doing any real imaging. Wednesday night is supposed to be clear and i’ll try to do my prep in advance and get a solid couple of hours outdoors.

Reducing Cone Error(Centering Polaris)

Cone error is the divergence between where the mount is pointing and where the attached camera or telescope is pointing. I decided to tackle this with the mount and camera in the polar home position – i.e. polaris should be close to the center of the image. Horizontal error is just a matter of rotating the camera around the declination axis – orthogonal to the polar axis, but vertical error is trickier. A telescope would have a means for adjusting it but with the camera on a dovetail bar attached to the mount there’s no obvious approach. When I first measured it in the left image above, Polaris was at 2810 vertically instead of the 1728 which would be the midpoint. Since the FOV was about 4.3 degrees, the error is about 1.34 degrees. After shimming the attachment plate Polaris last night was at about 1860, so still about .16 degree low.

In the picture below you can see the shims in place. I’ll try moving them halfway to the mounting bolt. I’ve tried doing calculations but they never work out. I’m a bit worried about making the attachment unstable but i might as well try.

In terms of reducing Chromatic Aberration I don’t think I’ve done much. The two images of Polaris below were before refocusing and stopping down on the right and after on the left. The left image is a bit better but not specifically the CA and there’s a lot of other stuff going on that affects the image.

UPDATE -here’s my cone error 20-05-18 – still a bit below center. I make it .2 degrees below center. I’m not sure I can do any better than that.

Polarissima Borealis (Can’t really see it, I just like the name)

Polar Area – Takumar 200 lens stopped down about 1/2 stop with filter rings(58 down to 49). 60 seconds at ISO 400

I was out last night mostly to work on focusing the Takumar 200mm lens, hoping to reduce chromatic aberration but I decided to image the polaris region to see if i could spot this beauty. In the middle of the highlighted circle above you can see for sure Gaia DR2 1152635154843863808, a magnitude 12 star and just up and to the right is NGC 3172. I can see it with the eye of faith but it’s tiny at 1X.7 arc minutes and low surface brightness at 13.7 mag/arcmin2

The plate solve below from astrometry.net is the only way I knew it was in frame then i tracked it down in stellarium.

Y Mask Success – Sirius-ly

Homemade Y Mask Sirius

The mask worked very well last night. Sirius is bright in the south and easy to focus on from our porch. This is with the 200mm Takumar lens f/4 ISO 6400 1 second.

I taped the lens to keep focus after this shot but I see that I moved the focus ring way too much when I adjusted it according to this. I’ll untape it and move the ring so it’s closer to the infinity mark. It will probably mess up the focus but that’s easy enough to fix. It was surprising how much i would move the focus ring to move the diffraction spike.

I’ve loosened and turned the focus ring per the video and hopefully the infinity focus is just to the right of the infinity mark with enough play for fine adjustment. I note that to bring the central diffraction spike UP on the Y mask i have to move the ring to the right – i.e. closer to the infinity mark.

Missed It By Thaaat Much…

I’m home in Ottawa, confined to quarters by the covid quarrantine but last night was clear so i got out in my side yard for a look. I haven’t go my mount set up but I wanted to see if i had a clear enough view of the pole to do alignment. I would say no problem – polaris is high enough in the sky to stay well clear of houses and i have a decent view between my house and my neighbour’s.

I figured i was aimed close enough to polaris to get it in my field of view but nope. NGC3172 in the bottom right is the charmingly named Polarissima Borealis – it’s not really visible in my image but i still like the name.

I’m looking forward to having the mount set up. I still won’t be able to do a multi star alignment but i had good luck finding things in florida just based on solid polar alignment. I suspect Polarissima Borealis is hopeless because it’s small and faint but there are a bunch of galaxies in the general area M81, M51, M101 should be in easy view.

UPDATE: After much poking around I identified the reddish star to the right in my image as OV Cep – a 5th magnitude star. The dimmest stars are around magnitude 10-11. Seeing was quite good and my focus is good. My image was taken at ISO 1600 for 3.2 sec at f/4 using the Takumar 200mm lens on the Canon t3i. I’m pretty happy with the lens and it’s about as much power as i can handle.

A Messier Evening

M51 and NGC5195

M51 is the whirlpool Galaxy. 23 MILLION light years away! It’s much prettier than my sad blur above but i’m delighted to have found and photographed it. The smaller blur on the left is NGC5195.

I took a number of exposures at 180 seconds, f/8, ISO 800 with a Takumar 200mm lens. I tried combining them with DeepSkyStacker but didn’t see any improvement. The image seems quite noisy and the stars are artifacted so if i’m out tonight i’ll try f/4 ISO 400 and maybe 240 seconds. I’ll also try 60 seconds.

This much better image is from Wikipedia

Polar Alignment With Pictures!

PhotoPolarAlign

I found a brilliant polar alignment program. You put the camera on the mount and align as well as you can. Then you take two pictures with the camera swung 90 degrees around the polar axis. The software uses plate solving to analyze the two images and tells you how to adjust the mount. It takes me a few iterations at a minute or so each but the results are great – Getting within say 5-10 arcminutes is pretty good but with this process i can get to <1 arc minute – 1/60 of a degree! Last minute I was shooting 3 minute exposures at 200mm with no star trailing.

A couple of caveats: The script is written in Python 2 which is obsolete and i had to poke at it a bit to get it working; It depends on downloading the cygwin software to run the astrometry software on windows which is also unfamiliar. The best info i found was in a forum post started in 2014.

Explore Scientific PMC-Eight Mount

I bought a new mount for astrophotography. Besides passively tracking to keep my camera steady it has “goto” capability for locating objects in the sky. It was definitely a big decision, even on sale at C$500.

I’ve had it out twice on our balcony overlooking the beach in a rented Florida condo. I have a good view to the east and north but limited to maybe 35 degrees altitude and no view to overhead or the west. It’s still pretty brilliant though to be outside at night without being cold or assaulted by neighbours’ yard lights.

Homemade alignment assist.

The first challenge is to align the mount with Polaris. The mount has a borehole in the Polar axis that you are supposed to sight through but the field of view is very small. I made a prealignment tool from a rolled up paper stick to the side of the mount that gives me a six degree view. With the North Star centered in that it’s much easier to nudge it into the borehole.

The paper tube and borehole got me roughly centered on Polaris and I went on to poke around the sky and take a few test pictures. At the end of the session I remembered reading about Photo Polar Alignment and I took two specific pictures of the Polaris area with the scope slewed 90 degrees between pictures. I used astrometry.net to solve the two images to see how I had done. The centers of the two images were about 1/2 degree apart which would probably be great for visual work but not great for astrophotography.

I downloaded a Python script called photopolaralign(PPA.PY) and ran it on my two images. This indicated that I needed to shift the mount 40′(arcminutes) – 2/3 degree laterally; and 18′ – 1/3 degree vertically. I’ll try it tonight in realtime – it’s supposed to be clear.

Photopolaralign: The X is where I am pointing, the green crosshair is where I should be.

M33 – The Triangulum Galaxy

20-01-04 M33

This is a very sad sort of thing to be pleased with, but I am!  On the left is the Triangulum constellation with alpha Triangulum near the center bottom, in the right top corner is Mirach in Andromeda.  The faint puff of gray off to the right about 1/3 of the way from alpha Tri to Mirach is the Triangulum galaxy!

This was 7 shots at 30 seconds with the Canon T3i, 50mm lens at f/2.8, and ISO 800.  The shots were stacked with Deep Sky Stacker then adjusted with Rawtherapee.  I picked the best 7 of 9 shots to stack and used the recommended parameters, in Rawtherapee I just played with the various sliders.  Black point is set to 5176, Shadow Compression to 0, Lightness to -6, and Contrast to +61.  All of those had some effect but Black and Shadow Compression probably the most.

My plan had been to shoot for 60 seconds at f/3.5 ISO 800 which is a bit more light but there is too much sky glow in my back yard.  My best shot of Bode’s Galaxy and the Cigar Galaxy was 60 seconds f/4 ISO 400.

The thumbnails below are just reminding me what the DSS and Rawtherapee screens look like:

UPDATE: Below is a further overprocessed image from rawtherapee and the corresponding settings. I note that in the original image I could see a bit of M31 the andromeda Galay in the top right. If I could reliably frame the two galaxies in would be an interesting image. Also, the jumble near the center of the original is NGC752 – an open cluster.

In Which I Am Focused – But “Y”

I made a new Y mask sized for my 50mm f/1.8 lens(which has a very small objective by the way) and tried it last night.  In the moment I did not find the mask helpful at all.  I couldn’t see the spikes on my LCD at all but when I uploaded them after focusing by eye I see the spikes perfectly.  So, my by-eye focusing worked as well as the mask would have in this instance but the mask is not hopeless. The shot was taken with the lens at f/4 4 seconds ISO 1600.  The star showing the spikes is Sirius by the way. Also by the way, when the focus was really off you could see the Y mask in the bloated star.  The thumbnail below was taken at f/1.8 1/2 second ISO 6400.19-12-12 Y Not 4488 (2)

I took a couple of further shots.  The best one captures most of Orion.  It’s below both original and after stretching it with the Paintshop Pro histogram functions.  They were shot at f/4 2 seconds ISO 1600.

19-12-12 4500stretched19-12-12 IMG_4500